User Provisioning
Workbench user provisioning
Workbench can be configured to automatically manage local accounts for users that authenticate via an external identity provider (IdP) that supports the System for Cross-domain Identity Management (SCIM) protocol. Reference the SCIM: System for Cross-domain Identity Management documentation for additional information on the SCIM specification.
Supported IdPs
Workbench currently supports the following IdPs for user provisioning (support for other IdPs may be added in the future):
- Okta: Reference Employee and Customer Identity Solutions | Okta for additional information.
- Microsoft Entra ID: Reference Microsoft Entra ID (formerly Azure Active Directory) | Microsoft Security for additional information.
Prerequisites
- Single Sign-On (SSO) must be configured in Workbench. Reference the OpenID Connect Authentication or the SAML Single Sign-On (SSO) Authentication sections of this guide for more information.
- A mechanism for provisioning user home directories must be configured in the system. See the Home directories section below for more information.
- Workbench, or an external proxy in front of Workbench, must be configured to use HTTPS with a Certificate Authority (CA) signed certificate. See the Running with a Proxy section of this guide for more information on how to configure Workbench to use a proxy, and the Set Up SSL section of this guide for more information on how to configure Workbench to use HTTPS.
How it works
Provisioning
When a user is assigned to the Workbench application in the IdP, the IdP sends a request to Workbench to create a new user. Workbench assigns a unique user ID (UID), home directory, and POSIX username to the user.
Workbench stores the following information for each user derived from the IdP:
user_id: The user ID (UID) of the user, used as the POSIX/Operating-System-Level ID of the user.user_name: The user’s username as provided by the IdP.posix_name: The user’s POSIX username is used to authenticate the user via PAM and to create the user’s home directory. By default, this is the same as the user’suser_namewith any domain suffix removed.homedir: The user’s home directory.is_admin: A boolean value indicating whether or not the user is an Administrator.shadow: The user’s shadow password. This is the password that is used to authenticate the user via PAM.display_name: The user’s display name as provided by the IdP.email: The user’s email address as provided by the IdP.
This information is stored in the licensed_users table in the Workbench database. See the Data Dictionary for more information.
SCIM API
When user provisioning is enabled, Workbench hosts an endpoint that implements the SCIM protocol. The IdP uses this endpoint to create, update, and delete users in Workbench. Workbench uses this endpoint to retrieve user information.
The endpoint is hosted at the following URL:
https://<workbench-hostname>/scim/v2NSS module
Workbench provides a Name Service Switch (NSS) module that surfaces users from a Posit Workbench instance to a local Linux system by querying Workbench’s SCIM API. The system uses this module to retrieve necessary user information. The NSS module is installed in the system when Workbench is installed, and provides functionality for the following NSS databases:
passwdgroupshadow
This NSS module is a required component for Workbench user provisioning, as it is used by Workbench, sessions, and other components to retrieve user information.
Reference Name Service Switch - Wikipedia for additional information on NSS.
Configuration
rserver.conf
To enable user provisioning, set the configuration option user-auto-provisioning-enabled to 1 in the file /etc/rstudio/rserver.conf:
rserver.conf
user-auto-provisioning-enabled=1After enabling this option, restart Workbench:
terminal
$ sudo rstudio-server restartConfiguring the minimum starting UID for provisioned users
By default, Workbench starts provisioning users with a minimum UID of 1000. This can be changed by setting the configuration option user-provisioning-start-uid in the file /etc/rstudio/rserver.conf. For example, to start provisioning users with a minimum UID of 2000, set the following configuration option in the file /etc/rstudio/rserver.conf:
rserver.conf
user-provisioning-start-uid=2000After setting this option and restarting Workbench, new users will be provisioned with the next available UID, starting from the value specified in this configuration option.
The minimum supported value for this configuration option is 1000.
workbench-nss.conf
Workbench automatically generates the workbench-nss.conf configuration file required by the NSS module at etc/rstudio/workbench-nss.conf. This file must be created on all nodes requiring the NSS library to access user information via system calls, such as Workbench nodes and Slurm compute nodes. The only exception is sessions running in containerized environments, as these sessions should use the launcher-sessions-create-container-user option.
The Workbench NSS module does not adhere to environment variables such as XDG_CONFIG_DIRS and RSTUDIO_CONFIG_DIR meaning that the configuration file must be created at /etc/rstudio/workbench-nss.conf and cannot be created anywhere else on the system.
One strategy for using Workbench configuration files in a separate location, such as when configuration files are in a shared location, is to set XDG_CONFIG_DIRS as such:
XDG_CONFIG_DIRS=/etc:/shared/etcThat way shared configuration files can be placed in /shared/etc/rstudio and workbench-nss.confcan be placed in /etc/rstudio.
This file may contain the following configuration options:
workbench-nss.conf
server-address=https://<workbench-hostname>
admin-token-path=/etc/rstudio/admin-token
user-token-path=/etc/rstudio/user-token
The server-address configuration option specifies the URL of the Workbench server that the NSS module uses to query the Workbench SCIM API. When generating the workbench-nss.conf file, Workbench automatically sets this option to the value from launcher-sessions-callback-address in etc/rstudio/rserver.conf.
The admin-token-path and user-token-path options specify the locations of the authentication tokens used by the NSS module. When generating the workbench-nss.conf file, Workbench automatically sets these options to their default locations of /etc/rstudio/admin-token and etc/rstudio/user-token. For more information on these tokens, see the NSS tokens section below.
nsswitch.conf
On most Linux distributions, the NSS module is installed and configured by default. However, the NSS module must be configured manually on some Linux distributions, such as RHEL 8 and RHEL 9. This is done by creating a custom authselect profile and enabling the pwb NSS module, as described in the steps below:
Create a custom
authselectprofile. If you are currently usingsssdfor user provisioning, you can base the new profile on thesssdprofile:terminal
$ sudo authselect create-profile pwb --base-on=sssdOtherwise, create the new profile based on the
minimalprofile:terminal
$ sudo authselect create-profile pwb --base-on=minimalEnable the
pwbmodule in the new profile. Edit the/etc/authselect/custom/pwb/nsswitch.conffile and add thepwbentry to the end of thepasswd,group, andshadowdatabases, for example:nsswitch.conf
passwd:     files {if "with-altfiles":altfiles }systemd pwb {exclude if "with-custom-passwd"}
group:      files {if "with-altfiles":altfiles }systemd pwb {exclude if "with-custom-group"}
shadow:     files pwb                                       {exclude if "with-custom-shadow"}
Enable the new profile. To enable the new profile, run the following command:
terminal
$ sudo authselect select pwb --with-mkhomedirTo make sure the
pam_oddjob_mkhomedirmodule is present andoddjobdservice is enabled and active:terminal
$ systemctl enable --now oddjobd.service
Home directories
Workbench user provisioning requires a mechanism for creating user home directories to be configured on the system. There are various ways to create home directories for users and one suggested method is to use the PAM module pam_mkhomedir.
The pam_mkhomedir module can be used to create user home directories on the fly when a user logs in for the first time. It must be installed and configured in the system. Reference pam_mkhomedir(8) - Linux man page for additonal information on this module.
The following configuration must be added to the PAM profile that is used by Workbench users:
session required pam_mkhomedir.so skel=/etc/skel umask=0022In most cases, PAM sessions must be enabled in Workbench to use this module. See this guide’s PAM Sessions & Kerberos section for more information on how Workbench can be configured to use PAM sessions.
Root home directory
For Workbench configurations that need to support user home directories in a location other than /home, the configuration option user-homedir-path can be used to specify the root directory where user home directories is created. This option is only used when the configuration option user-auto-provisioning-enabled is enabled.
rserver.conf
user-homedir-path=/mnt/homeNSS tokens
The NSS module requires two tokens to be generated and installed on the system. These tokens are used by the NSS module to authenticate requests to the Workbench SCIM API. When user provisioning is enabled, Workbench automatically generates these tokens on startup and installs them on the system. By default, the tokens are installed to /etc/rstudio/admin-token and /etc/rstudio/user-token. See the Custom token paths section below for information on how to configure these paths.
The admin token is used by the NSS module when the process that loaded the module is running effectively as the root user. The user token is used by the NSS module when the process that loaded the module is not running effectively as the root user. This controls access to the user’s shadow entry.
Custom token paths
By default, the NSS module looks for the admin and user tokens in /etc/rstudio/admin-token and /etc/rstudio/user-token. If you wish to use a different location for these tokens, for instance, to share them across multiple nodes, you can specify the token paths in the file /etc/rstudio/workbench-nss.conf:
workbench-nss.conf
server-address=https://<workbench-hostname>
admin-token-path=/mnt/shared/admin-token
user-token-path=/mnt/shared/user-token
Workbench session components for Slurm compute nodes
If you are using Slurm compute nodes with Workbench, you must install and configure the NSS module on the compute nodes. This is required so the session components can use the NSS module to retrieve user information.
Make a symlink from
/usr/lib/rstudio-server/binto a system library location, such as/usr/lib/x86_64-linux-gnuon debian systems or/usr/lib64on RHEL systems.terminal
$ sudo ln -s /usr/lib/rstudio-server/bin/libnss_pwb.so /usr/lib/x86_64_linux_gnu/libnss_pwb.so.2Configure
pwbas a NSS module in/etc/nsswitch.conf. Thepwbentry should be added at the end of thepasswd,group, andshadowdatabases:nsswitch.conf
passwd:         files systemd pwb
group:          files systemd pwb
shadow:         files pwb
On RHEL systems, see the nsswitch.conf section above for more information on how to configure the NSS module.
Create the
/etc/rstudio/workbench-nss.conffile. See the workbench-nss.conf section above for more information on how to configure this file.
Integrating with your Identity Provider
Okta
To configure Okta to work with Workbench, SSO must be configured in Workbench via SAML or OIDC. See the SAML Single Sign-On Authentication section or the OpenID Connect Authentication section of this guide for more information. See the Authenticating Users section of this guide for more general information on configuring authentication in Workbench.
Below is an example of how to configure Okta to use Workbench’s user provisioning SCIM API. This example assumes that Workbench is configured to use SAML for authentication. Please reference the About provisioning section of Okta’s documentation for more information on getting started with provisioning and how to configure Okta to use SCIM for your application.
Once your authentication application is configured in Okta, you can configure Okta to use Workbench’s SCIM API to provision users.
From the main page of your application in Okta, do the following:
- Click Provisioning.
- Click Integration.
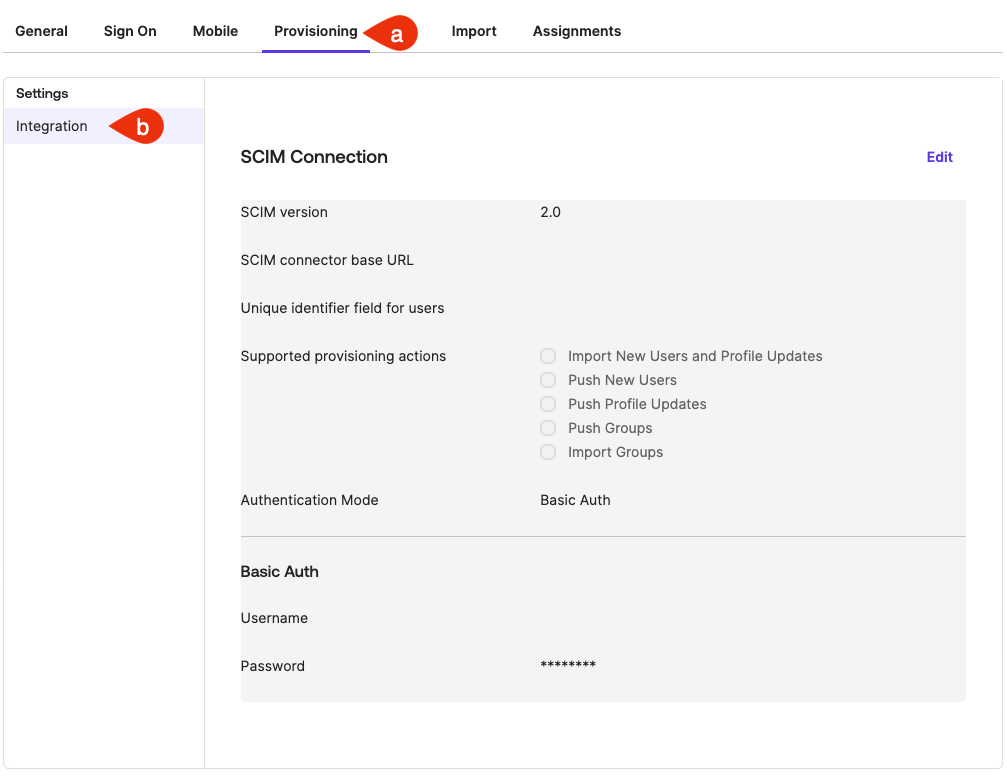
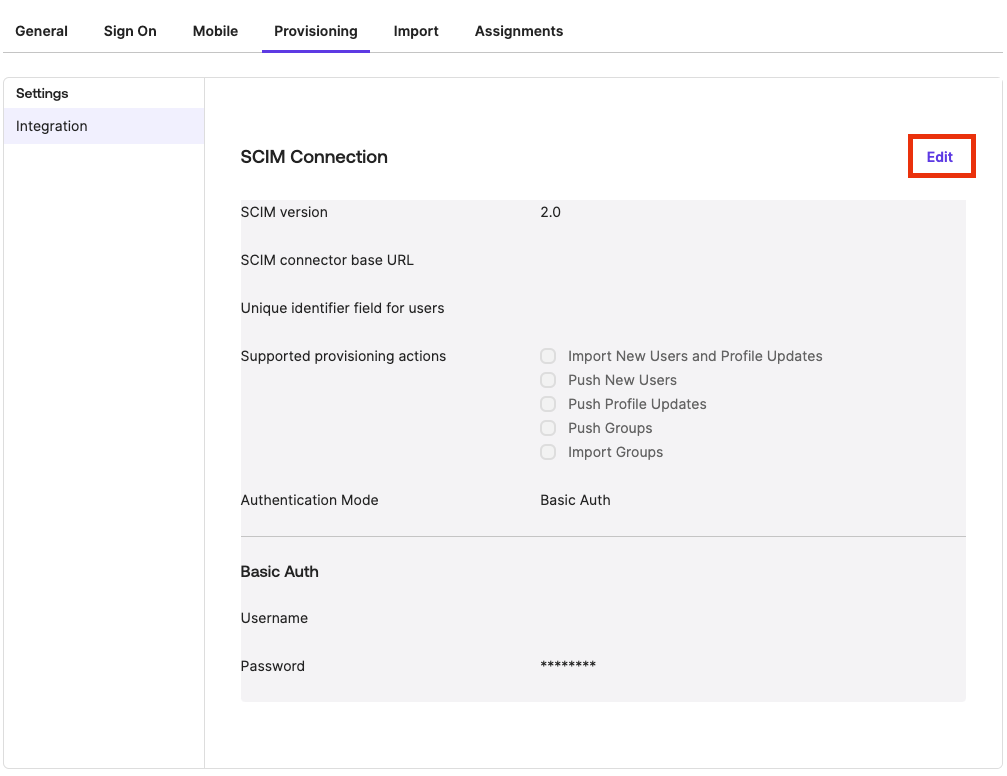
This displays the SCIM Connection section.
In the SCIM Connection section, click Edit.
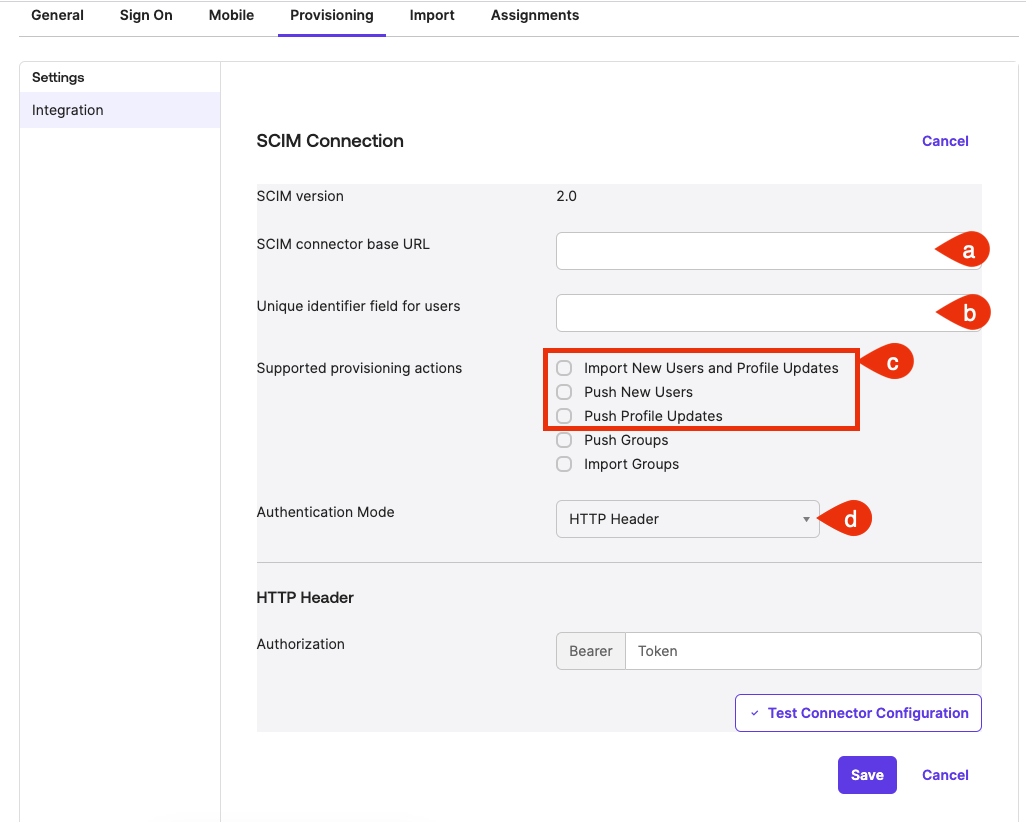
Do the following:
- In the SCIM connector Base URL fields, type the URL of the SCIM API endpoint hosted by your Workbench instance.
For example: https:///scim/v2 - In the Unique identifier field for users field, type “userName”.
- For the Supported provisioning actions field, select the following:
Import New Users and Profile Updates
Push New Users
Push Profile Updates
Push Groups optionThe Push Groups option is not supported by Workbench at this time.
- From the Authentication Mode drop-down, select HTTP Header
- In the SCIM connector Base URL fields, type the URL of the SCIM API endpoint hosted by your Workbench instance.
Workbench uses a bearer token to authenticate requests to the SCIM API. Run the following command on the Workbench server to generate an authentication token:
terminal
$ sudo rstudio-server user-service generate-token "Okta"This generates a token that can be used to authenticate requests to the SCIM API. See the Managing Tokens section below for more information on managing Workbench user service tokens.
Copy the token and paste it into the Authorization field in Okta.

To trigger a test of the connection to Workbench, click Test Connector Configuration.
 If the connection is successful, a similar message should display:
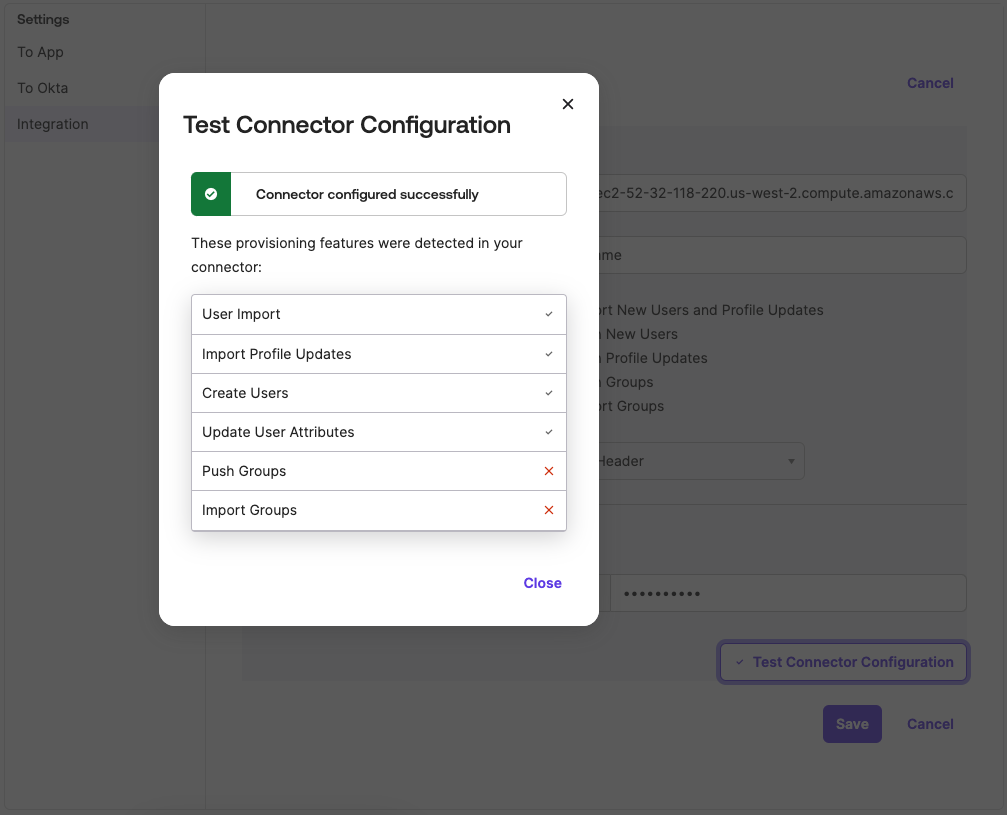
Click Close to dismiss the message. Click Save to save the configuration.
With provisioning configured successfully, any users that are assigned to the Workbench application in Okta are automatically created in Workbench.
Custom fields
Workbench supports the following custom fields in Okta:
posixUsername: The user’s posix username. This is the username that is used when starting sessions in Workbench.homeDirectory: The user’s home directory. By default this uses the value of theuser-homedir-pathconfiguration option in Workbench.admin: A boolean value indicating whether the user is an administrator or not. By default this isfalse.
These fields can be added to the Okta user profile and set to the desired values when assigning users to the Workbench application in Okta. See the Add custom attributes to an Okta user profile section of Okta’s documentation for more information on adding custom user attributes in Okta.
Managing tokens
Workbench provides a CLI tool for managing tokens. This tool can be used to generate, list, and revoke tokens. This tool is installed with Workbench and can be accessed via the rstudio-server command.
Generating tokens
To generate a token, run the following command on the Workbench server:
terminal
$ sudo rstudio-server user-service generate-token "My Token"This generates a token with the name My Token and prints the token to the terminal. This token can be used to authenticate requests to the Workbench SCIM API. By default, tokens are valid for 365 days.
The following options are available for this command:
--duration: The duration of the token to generate (in days). By default, tokens are valid for 365 days.--no-expiry: Generate a token that does not expire.
Listing tokens
To list all tokens, run the following command on the Workbench server:
terminal
$ sudo rstudio-server user-service list-tokensThis prints a table of all tokens to the terminal, including the token name, scrubbed token key, creation date, expiration date, and last used date.
Revoking tokens
To revoke a token, run the following command on the Workbench server:
terminal
$ sudo rstudio-server user-service revoke-token "My Token"The following options are available for this command:
--all: Revoke all tokens.
User provisioning with sssd
It is a common practice in Linux environments to configure sssd to fetch users and groups from an LDAP or Active Directory server to automate the creation (provisioning) of local system accounts.
In addition to user creation, sssd can also be configured to authenticate or authorize users via PAM using the pam_sss module.
nss is an older alternative to sssd that also has LDAP synchronization capabilities. However, differently from sssd, it offers no support for authentication.
When a user has an active session in Posit Workbench, changes to his or her local account name (username) or uid are not supported and it can lead to unexpected behaviors in Workbench.